Mounting pinhole diaphragms on support slides
The electronic microscope diaphragms are splendid pinhole of perfectly known and regular diameter, but they are small (circular 3mm slides) and they have to be mounted on bigger support slide not to ruin them and to use them more easily. This article will expose some suggestions that will let you mount them in an easy and efficient way. The holes are not sold mounted as the exigencies of every photographer could vary.
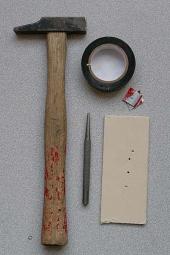
The necessary currency material: an aluminum tin can, some black adhesive tape (the one used by electricians) and an instrument to make 2mm holes. If you got a drill and a 2mm drill bit, well you got the whole! But unfortunately not everyone has a little workshop in its house. I procured a 2mm punch, which is 1,50 euros in any ironmonger’s. I think that everyone has a hammer in its house, as well as a piece of compact cardboard that will be your pad, therefore the expense to get everything you need is quite contained.
Let’s start cutting a piece of aluminum from the tin can. It must be of the desired dimensions, let’s say up from a cm2. Let’s cut a couple of centimeters of tape or put the aluminum slide at the center of it. It is not necessary that they fast completely to each other, the tape will be taken apart during next step. Lay everything on your paper pad, the tape looking on top, put the punch in the center and beat with your hammer, so that you contemporary create a hole in the tape and in the aluminum.
At this point you can detach the tape and put it within reach, for example fasten at the border of your table. If you used the punch, the slide will be bended on one side and will present a little cone on the opposite side. Therefore you must turn it and give a couple of hits with your hammer to flatten it. It could be necessary to turn the slide again and give some little smacks to both sides. If there’s some smears, it could be useful some sandpaper, but it is usually easy to form clean and faultless holes. If the slide is big and is not covered entirely by tape, for example in the case the slide will be an entire wall of the pinhole camera, it is the moment when you must paint it black. Black opaque spray painting is not expensive and will dry in a short time.
At this point it is necessary to work with precision. The idea is to put the electronic microscope diaphragm on the table you’re working on. The pierced tape must adhere with the diaphragm, in a way that the diaphragm hole will be exactly centered with the hole of the tape. Thanks to the tape glue, the diaphragm will be stuck. Then you put the tape on the surface, with the glue and the diaphragm side looking to the top; you make the aluminum slide adhere to the tape, in a way that all the holes will be superimposed. This way, the microscope diaphragm is free at the center of the sandwich, between adhesive tape and one-millimeter aluminum all around its border.
I personally find tables a little bit uncomfortable, as there’s no space for fingers to work. So I put the microscope diaphragm on a one-centimeter-diameter cylinder, some centimeters long. I use a lipstick case, but just because it was the first thing that came into my mind with that precise shape. This trick helps me put my wrists on the table and lets my fingers come closer the diaphragm. It is easy to put the holes together looking through the tape hole before and through the aluminum after.
That’s all, folks. You just need to control the tape is perfectly stuck and the slide perfectly mounted in the center. Easier said than done. I mounted tenth diaphragms for now, and no one was wrong, therefore the procedure I explained shouldn’t be so hard.
At this point you can paint the inside of the diaphragms with a black felt-tip if you want, but I strongly suggest to do this only in case of real need, since you could damage the hole. Reflection problems could bear only with lots of sun and with backlight pictures; the majority of the pictures and cloudy days don’t require painted holes.
The dimensions of the support slide depend on the thickness of the material on which the rest of the box was made of. The more it is thick the bigger the support slide must be, to move away widths that could project shadows, limiting the effective dimension of the image recorded on sensitive supports. To the limit, one wall of the box can be built with the aluminum of a tin can. If you’re using a tin box, the metal is thin enough to allow 2mm-holes directly in the cover of the box.


Camera Obscura » Diaframmi di microscopio elettronico come buco stenopeico
said, December 18, 2007 @ 10:17 am :
[...] di una piastrina circolare di rame di 3mm di diametro. il metodo più semplice per utilizzarlo è montarle su una lastrina di supporto. Attenzione che si tratta di materiale fragile e di precisione, che va trattato con cura. Una volta [...]
La Cochinilla (III). Estenopo de precisión « El Ojo Ciego de Nicéforo N.
said, October 21, 2010 @ 11:47 am :
[...] pequeño y frágil. Aquí, de nuevo, vino en mi ayuda el señor Busdraghi, pues tiene también un artículo en el que cuenta cómo se ha enfrentado él a tal eventualidad. Después de sopesar bien la opción [...]