


Local sharpening techniques and noise reduction
Categories: Light room — Tags: Acutanza, Artefatti, Granulosità, Rumore, Sharpen
Translations:
 italiano •
Sharpen and noise reduction of Camera Raw have been set to zero and all of the operations have been done at 16 bit. Smart Sharpen and Noise Ninja have been applied under all the adjustment layers, which means that all the filter operations have been applied after the “developing” with Camera Raw and before the tonal corrections in Photoshop. At the end of your work, all the image versions have been flatten, converted to 8bit-sRGB and saved in JPEG format with 10 as compression value. The attached images are all cropped at 100% of the original image; no modification has been made to the native dimension of the picture. To comfortably compare all the images, I suggest downloading them and observing each on 100% zoom, as the aliasing effects could modify the acutance perception and the noise reduction. A compressed file with all the images of the article is available for the download (2.3 Mb).
Simple use of Noise Ninja and Smart Sharpen

The first image is the file without any filter. The chromatic noise is particularly annoying on pants, while in uniform background zones the luminance noise is irritating. The image is thick and less detailed because of the loss of sharpness due to the demosaicing process. To obtain an acceptable result, the noise must disappear from clothes, keeping at the same time the natural appearance that they are constituted of. Moreover, the background luminance should be reduced, without compromising its mosaic lines.
Just to be complete, this is the result you get using sharpen and noise reduction integrated in Camera Raw. The chromatic noise disappeared from pants, but their details too. More refined instruments will lead you to richer details. At the same time on the background there are artifacts that I find unpleasant, Noise Ninja is definitely more efficient.
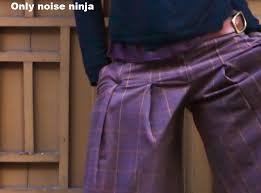
Applying only Noise Ninja on the entire image, the result is amazing on uniform zones, but the algorithm keeps the sharpness of the background mosaic lines as well. Unfortunately though, the details of clothes are irreparably flatten, giving the picture a plastic and false aspect, particularly objectionable. The following application of Smart Sharpen allows to recover some acutance, but visibly augment the residual noise that hasn’t been filtered by Noise Ninja.
In like manner, applying only Smart Sharpen on the entire image doesn’t lead to any good result. The picture is sharpened but noise is amplified unacceptably. Using Noise Ninja after Smart Sharpen as well is disastrous.
Surface and edge mask usage
The surface mask is equal but inverted.
Using Noise Ninja and Smart Sharpen together is one possible solution, trying to separate their effects so that the first one will be applied only on uniform areas and the second one only on the edges of the image. The difference compared to previous results is that no more filters are applied on the entire image. Where sharpen is applied noise reduction is not and vice versa.
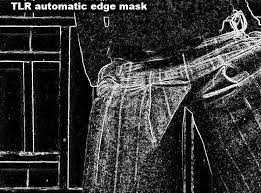
TLR plug-in automatically generates some surface and edge masks. Two background-copy layers are created, one with surface mask and Noise Ninja and the other one on top with edge mask and Smart Sharpen. Please remember to put blend option to luminosity of the sharpen layer, so that the chromatic noise won’t be emphasized.
This kind of configuration used on our image allows satisfying results for the background, where the noise is almost completely gone from the flatten areas, while the mosaic lines are correctly accented from the sharpen. The shown example is only the result obtained automatically, adjusting Noise Ninja and Smart Sharpen values; varying layers opacity and ameliorating masks by hand you will achieve excellent results.
